Pages

Saturday, October 27, 2012

Toddler Activity: Painting Pumpkins

While I have fond childhood memories of carving pumpkins at Halloween, the thought of attempting to carve a pumpkin with Kat makes me shudder!  She's 21-months, so she has an attention span that's about 21 seconds, follows about 21% of any instructions I give her, and would probably end up needing 21 stitches.  But I didn't want to skip all pumpkin activities.

So last weekend, during our family trip to the grocery store, I let Kat pick out a small pie pumpkin by herself.  Surprisingly, she picked one of the smallest ones; I thought kids always went for the biggest is best philosophy.  I also picked out a pie pumpkin for myself with the intention of making my own pumpkin puree - more on that soon! (Update 11/4/12: See how to make pumpkin puree.)

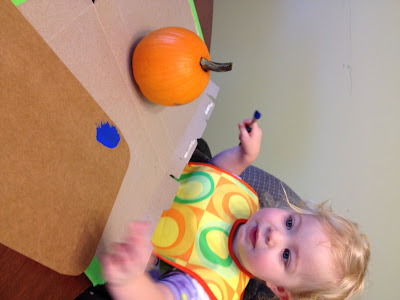
Sunday afternoon, Kat and I set up a painting station at the kitchen table.  I taped a couple broken down cereal boxes to the table to create a work surface and to hopefully make clean-up easier.  I put a bib on Kat and sat her in her booster chair. 


I let her pick five colors from my collection of acrylic paints.  I like acrylic paints because they wash off with water, are available at most craft stores, and are pretty cheap (less than $2/bottle).  I have a whole shoebox of paint bottles from my time in college when I was still trying to be "artsy".  I also pulled out one paintbrush for each color to minimize the need to rinse brushes mid-project.

I squirted a bit of paint on the cardboard, handed over the paintbrush, and let her go!


I tried to avoid "helping" (a.k.a. taking over), and stuck to just turning the pumpkin whenever one side was mostly covered.  I let Kat decide when she was ready for a new color and then swapped brushes with her.  Amazingly, the paint was contained to the cardboard and just a bit on her fingers (yea for no paint in her hair!!).  


This project kept her attention for about 15 minutes.  From set-up to clean-up was slightly longer than a football game halftime.  ;-)  And since it wasn't overly messy, I think we'll have to try more painting projects for future holidays.   Any ideas?
Wednesday, October 24, 2012

Winter Hat for Kat, Part 1

Fall is definitely my favorite season.  It's the time of comfort foods - chili, stew, apple or pumpkin anything; and the weather is just cool enough to call for an extra layer, but not so cold as to rule out spending an afternoon outside.

This fall, Kat is in the Toddler room at daycare, which means that they spend part of most afternoons outside.  This also means that it's time to send all the fall and winter clothing supplies  that will live in her cubby - warm hat, jacket, back-up outfit with long pants and long-sleeved shirt.  When NerdDad asked if we had an extra hat to send, I promptly said that I would make one!  He laughed...

But my knitting and crochet skills are getting to be pretty good, and a hat is small enough that I can measure time to completion in hours, not days.   I'm not sure why he laughed; I have made three different hats for Kat, and another hat for Buddy.  So it's not like I'm a hat-newbie.

I quickly hopped on Ravelry (you can find me here) and began looking for a pattern.  Since I already have a crochet project in progress, I wanted something I could knit.  I also wanted something fairly simple that Kat could pull on herself (no ties or flaps).  I settled on this Swirl Hat.  The pattern is straightforward, but the swirl adds some fun.


I'm using a very dark pink that matches her coat - gotta keep things fashionable!  I am making pretty good progress, especially considering that I ripped out 6 rounds because I had an extra loop of yarn just hanging out (grr!).  I have finished the ribbed edge, and have (re)started on the swirl pattern.

Are you a knitter?  If so, what are you working on?

Tuesday, October 23, 2012

Recipe: Pesto Chicken Grilled Cheese

After trying out a new recipe for Seasoned Chicken, I wanted to find a quick way to try out some of the chicken that I just made.  I found some sliced provolone cheese in the refrigerator and decided to do a spin on grilled cheese. The result was a Pesto Chicken Grilled Cheese, and it was amazing!

I started by shredding one of the Seasoned Chicken tenders.  I wanted to slice it, but grabbed the wrong knife, and ended up with shredded.  Oh well!  I pulled out a couple pieces of bread, two slices of provolone cheese, a bit of margarine (you could use butter too), and a cube of frozen homemade pesto (you could also use store-bought). 


Heat up a griddle or skillet with just a bit of cooking spray.  Butter one side of each piece of bread, and place the first piece of bread on the griddle, butter side down.  Top the bread with about half a tablespoon of pesto.


Next, assemble the sandwich.  Layer on a slice of cheese, then the shredded chicken, another slice of cheese, and finally, the other piece of bread, butter side up.


After a few minutes, flip the whole sandwich.  The bread should be toasted and lightly browned.  Cook for another few minutes to toast the other side.


This sandwich has the gooey goodness of grilled cheese, is hearty enough to stand as a meal because of the chicken, and  has amazing flavor from the pesto.  It reminded me of something that I would typically order at a deli.  Yum!


Monday, October 22, 2012

Recipe: Seasoned Chicken


I often use Pinterest to find new recipes.  However, I have a hard time actually following the recipe exactly.  While I'm sure the original recipes are just fine, I like to use the recipes I find as inspiration or a jumping off point, not as a rulebook.  I've been cooking for over ten years now, and have tried enough recipes to guess what might work (and have learned a lot about what doesn't!).  If you are new to cooking, or trying a new style or kind of dish, then certainly follow the directions!  But after a few tries, be confident enough to make a few changes or try a shortcut.

When my daughter was born almost two years ago, I started trying out more freezer meals.  I could spend an afternoon cooking, and then not feel so rushed once I got home from work.  And for a while, I kept cooked cubed or shredded chicken in the freezer, so I was ready when I came across a casserole, pasta dish, or salad that called for cooked chicken.  But this chicken never tasted very good, so I stopped.  But when I came across a link to The Perfect Chicken, I realized that of course that chicken wouldn't taste good; I never seasoned it!  I had mistakenly thought that I shouldn't season it since I didn't know what dish I would be using it in.  But the recipe for Perfect Chicken uses spices that are common enough to most dishes and aren't overpowering, so the chicken could still be used in whatever I need it for.

The recipe makes a simple spice rub using salt, pepper, paprika, onion powder and garlic powder.  I quickly through together a batch.  


I had purchased a package of fresh chicken tenders earlier this week for another dinner, and after seeing this recipe, intentionally put a few of the tenders back in the refrigerator so that I could try out this recipe.  The recipe made plenty for the four tenders that I had, and probably would have been enough for another four. 


I browned the tenders on the stovetop as instructed in the recipe.  Because I was using tenders instead of full chicken breasts, I decided I could finish cooking on the stovetop, instead of baking as instructed, because the tenders were thin enough to cook through without getting dried out.  I simply lowered the heat and added a lid to keep the moisture in. 


This was a quick way to add more flavor to plain boneless, skinless chicken.  The spice rub came together in less than a minute, browning the chicken took about five minutes, and then I let the chicken sit unattended and covered on low for about ten minutes to finish cooking.  I haven't tried freezing this yet, but will soon.  The chicken looked so good, I immediately looked for a way to use it and came up with a Pesto Chicken Grilled Cheese 

Do you have an easy spice rub recipe for chicken?

Friday, October 19, 2012

Apple Picking

My sisters were in town visiting this past weekend. With a weather forecast that predicted a near perfect fall day, we decided to venture out and pick our own apples at Lynd Fruit Farm.  Because we wanted to finish up before lunch and naptime, we got moving fairly early, packed everyone into our new (to us) minivan, and made the 40 minute drive out of the city.

The farm had three apple varieties ready for harvest - Rome, Fuji, and Winesap. We quickly ruled out Rome apples as they are grown on large trees.  We realized that with me wearing Buddy and the toddler wanting to pick her own apples, we should stick to the small trees. Since Fuji apples are readily available at the grocery store, we decided to branch out and try Winesap, an heirloom variety that is good for eating, sauce, and baking.


Kat was slightly frustrated at first as she wasn't strong enough to pick the apples on her own. Fortunately, Aunt K saved the day by teaching us to rotate the apples a few times to loosen them up enough to let Kat pluck the apple off.

Kat was even more excited about apple picking when NerdDad let her pick an apple to eat as we were walking through the orchard.  We all had a fantastic time and enjoyed the perfect fall morning.  By the time we were leaving the traffic to get in was nightmare; I was so glad that we had gotten there early!


We picked half a bushel of apples (about the size of a standard plastic grocery bag) for $20, so this was a fairly inexpensive outing.  My sisters promised to take a few apples home with them, but I still have enough apples to entirely fill my refrigerator's crisper drawer.  Fortunately, if stored properly, the apples should last for a couple of months.  I'll soon be posting some of the ways that I intend to take advantage of our fall harvest! 

However, if you have suggestions beyond the basic apple sauce, pie or crisp, please share!